WordPressを利用したWEBサイトでは、テーマという仕組みでサイトの外観を切り替えることができます。このサイトもWordpressで運用しており、初めからインストールされていた「Twenty Seventeen」というテーマを使用しています。とある理由で、テーマを少しだけカスタマイズしたくなりました。
というわけで、子テーマを作成してみました。
テーマをカスタマイズしたい場合、現在利用している「Twenty Seventeen」のテーマファイルを直接編集することもできます。しかし、直接編集すると、どこを変更したかがわかりにくくなり、また、テーマが更新されたときに差分がわかりにくくアップデートが大変になりそうです。といっても、テーマ全体を作成するのも大変です。テーマを少しだけカスタマイズしたいだけなのです。
何かいい方法はないかなぁと調べたところ、WordPressには、テーマを派生させる仕組みがあることがわかりました。別のテーマを派生して作成したテーマは子テーマというそうです。もう少し調べてみると「子テーマは、親テーマと呼ばれる別のテーマの機能とスタイルを継承したテーマです。既存のテーマを変更する方法として、子テーマが推奨されています。」とありました。今回の目的にぴったりです。
子テーマに挑戦してみたので作成方法を記録として残しておきます。
子テーマを作成するには、まず、派生元のテーマ(親テーマ)を決める必要があります。派生元にはどのテーマでも利用できるようですが、今回は、現在使用している「Twenty Seventeen」のテーマを派生元のテーマとします。
ここから先は、サイト上のファイルをコピーしたり、編集したりする必要があります。サイトのサーバーにSSHなどでリモートログインして編集してもよいですし、FTPで指定の場所にファイルを置いてもよいです。 お名前.comレンタルサーバー![]() では、サイト上のファイルの作成や更新方法には、
では、サイト上のファイルの作成や更新方法には、
- SSHでリモートログインして直接編集
- PC側で編集したものをFTPでアップロード
- PC側で編集したものをFTPのWEB UI(ファイルマネージャー)を使ってアップロード
などの方法が利用できます。好みの方法でファイルを更新してください。
さて、まずは、WordPressのテーマファイルのありかです。テーマファイルは、WordPressのインストールフォルダの配下の
{WordPressインストールフォルダー}/wp-content/themes/
にあります。 お名前.comレンタルサーバー![]() の場合は、独自ドメイン名がsw-test.workだった場合、
の場合は、独自ドメイン名がsw-test.workだった場合、
SSHでは、
/export/sd123/www/jp/r/e/gmoserver/2/0/sd123456/sw-test.work/wp/wp-content/themes/
みたいなフォルダーパスになります。
FTPやファイルマネージャーでは、ホームディレクトリがルートとなっているので、
/sw-test.work/wp/wp-content/themes/
みたいなフォルダーパスになります。この中にインストール済みのテーマのフォルダが存在します。例えば初期状態であれば、以下のようなフォルダー構成です。
ssh$ ls -l
total 13
-rw-r--r-- 1 sd123456 saba-www 28 Jan 25 13:15 index.php
drwxr-xr-x 6 sd123456 saba-www 28 Jan 25 13:15 twentyfifteen
drwxr-xr-x 5 sd123456 saba-www 22 Jan 25 13:15 twentyseventeen
drwxr-xr-x 7 sd123456 saba-www 25 Jan 25 13:15 twentysixteen
今回作成するのは「Twenty Seventeen」から派生する子テーマです。テーマ名を「Twenty Seventeen Child」とし、テーマを保存するフォルダーは「twentyseventeen-child」とします。
子テーマのフォルダには最低限、
- style.css
- functions.php
が必要となります。
子テーマを追加する前のダッシュボードはこのようになっています。
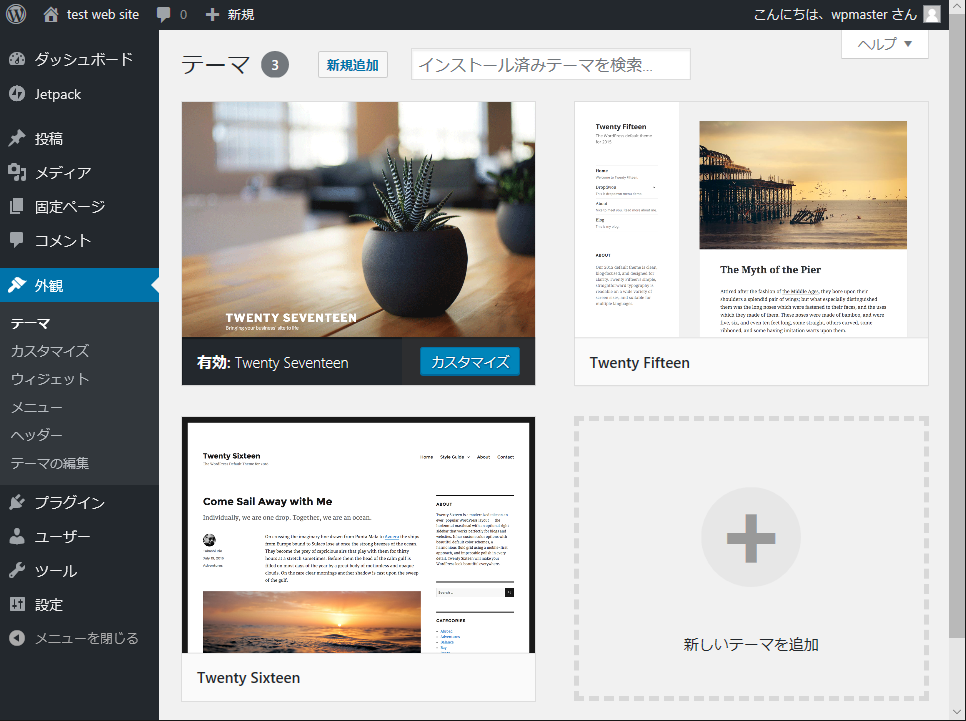
デフォルトのテーマである「Twenty Seventeen」、「Twenty Fifteen」、「Twenty Sixteen」の3つのテーマが存在します。ここに子テーマが表示されるようにします。
まずは、子テーマ用のフォルダー「twentyseventeen-child」を作成します。
ssh$ mkdir twentyseventeen-child
ssh$ ls -l
total 13
-rw-r--r-- 1 sd123456 saba-www 28 Jan 25 13:15 index.php
drwxr-xr-x 6 sd123456 saba-www 28 Jan 25 13:15 twentyfifteen
drwxr-xr-x 5 sd123456 saba-www 22 Jan 25 13:15 twentyseventeen
drwxr-xr-x 5 sd123456 saba-www  2 Jan 25 14:00 twentyseventeen-child
drwxr-xr-x 7 sd123456 saba-www 25 Jan 25 13:15 twentysixteen
この作成したフォルダー内に子テーマを定義するファイルであるstyle.cssファイルを作成します。style.css内容は、一から作成してもよいのですが、編集を楽にするために親テーマのstyle.cssファイルの先頭の /* から */ までをコピーして編集します。以下が今回の親テーマである「Twenty Seventeen」のstyle.cssファイルの先頭の部分です。
/*
Theme Name: Twenty Seventeen
Theme URI: https://wordpress.org/themes/twentyseventeen/
Author: the WordPress team
Author URI: https://wordpress.org/
Description: Twenty Seventeen brings your site to life with header video
 and immersive featured images. With a focus on business sites,
 it features multiple sections on the front page as well as widgets,
 navigation and social menus, a logo, and more. Personalize its
 asymmetrical grid with a custom color scheme and showcase your
 multimedia content with post formats. Our default theme for 2017 works
 great in many languages, for any abilities, and on any device.
Version: 1.4
License: GNU General Public License v2 or later
License URI: http://www.gnu.org/licenses/gpl-2.0.html
Text Domain: twentyseventeen
Tags: one-column, two-columns, right-sidebar, flexible-header,
 accessibility-ready, custom-colors, custom-header, custom-menu,
 custom-logo, editor-style, featured-images, footer-widgets,
 post-formats, rtl-language-support, sticky-post, theme-options,
 threaded-comments, translation-ready

This theme, like WordPress, is licensed under the GPL.
Use it to make something cool, have fun, and share what you've learned
 with others.
*/
以下省略
SSHを利用している場合、
ssh$ mkdir twentyseventeen-child
ssh$ cd twentyseventeen-child
ssh$ head -16 ../twentyseventeen/style.css > style.css
と実行することで、元テーマの先頭16行をコピーできます。この作成したファイルを編集します。viエディタを使って編集する場合は、
vi style.css
です。
編集が必要な部分(赤色)は少しです。
/*
Theme Name: Twenty Seventeen Child
Template: twentyseventeen
Theme URI: https://example.com/themes/twentyseventeen-child/
Author: the WordPress team
Author URI: https://wordpress.org/
Description: Twenty Seventeen brings your site to life with header video
 and immersive featured images. With a focus on business sites,
 it features multiple sections on the front page as well as widgets,
 navigation and social menus, a logo, and more. Personalize its
 asymmetrical grid with a custom color scheme and showcase your
 multimedia content with post formats. Our default theme for 2017 works
 great in many languages, for any abilities, and on any device.
Version: 1.4
License: GNU General Public License v2 or later
License URI: http://www.gnu.org/licenses/gpl-2.0.html
Text Domain: twentyseventeen
Tags: one-column, two-columns, right-sidebar, flexible-header,
 accessibility-ready, custom-colors, custom-header, custom-menu,
 custom-logo, editor-style, featured-images, footer-widgets,
 post-formats, rtl-language-support, sticky-post, theme-options,
 threaded-comments, translation-ready

This theme, like WordPress, is licensed under the GPL.
Use it to make something cool, have fun, and share what you've learned
 with others.
*/
子テーマのstyle.cssファイルで必須項目は、Theme Name および Template です。その他の項目は必須ではないですが項目を残しました。Theme URIはそのままではいかにもと思ったので、存在しないURLに変更しています。他の項目は、派生しているので、同じ値が適切かと思い同じ値を使いました。
Theme Nameは、この子テーマの名前です。今回は、親テーマの名前の後ろにChildを付けてみました。
Templateは、派生元のテーマのフォルダー名を指定します。「Twenty Seventeen」のフォルダー名は「twentyseventeen」なので、「twentyseventeen」を設定します。テーマ名ではなくフォルダー名なので注意してください。
子テーマのフォルダーには、functions.php ファイルも必要です。以下の内容のファイルを作成します。
<?php
add_action( 'wp_enqueue_scripts', 'theme_enqueue_styles' );
function theme_enqueue_styles() {
    wp_enqueue_style( 'parent-style',
        get_template_directory_uri() . '/style.css' );
    wp_enqueue_style( 'child-style',
        get_stylesheet_directory_uri() . '/style.css',
        array('parent-style')
    );
}
?>
この記述は、親テーマがスタイルを一つのsytle.cssファイルで管理しているときのみ有効です。複数のcssファイルを使用している場合は、それなりの対応が必要です。標準テーマである「Twenty Seventeen」などは、ひとつのsytle.cssファイルですべてのスタイルを管理しているので、上記の記述で問題ありません。
これで子テーマのテーマフォルダーに必要な最低限のファイルはそろいました。
ダッシュボードからテーマ一覧を確認すると、新しい子テーマが追加されているのが確認できます。
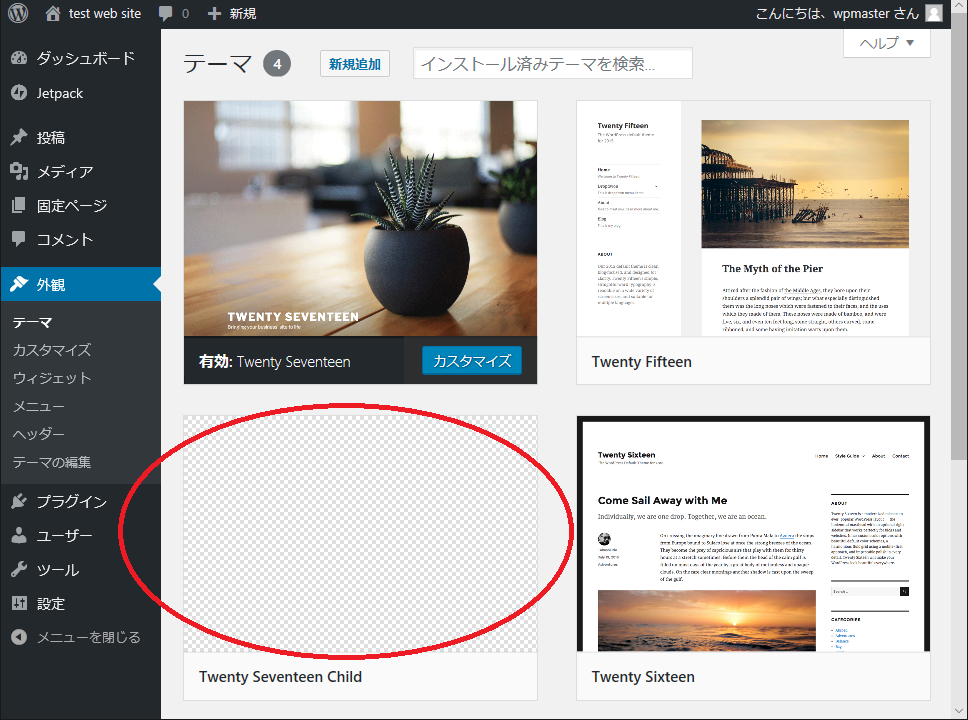
ただ、サムネイルが表示されなくなんかさみしいです。それを解決するために親テーマのテーマフォルダーからサムネイルファイル(screenshot.png)をコピーします。
SSHを利用している場合、
ssh$ cp ../twentyseventeen/screenshot.png .
で、元テーマのサムネイルファイルをコピーできます。
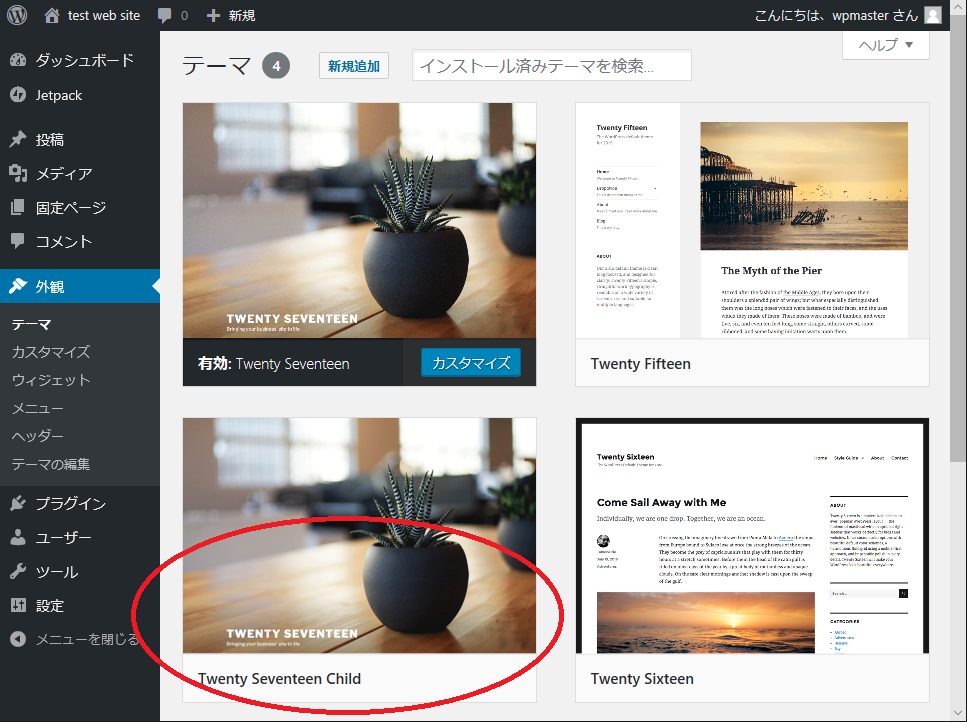
これでサムネイルも表示されるようになりました。結果として、子テーマのテーマフォルダーには以下の三つのファイルになります。
ssh$ ls -l
total 368
-rw-r--r-- 1 sd123456 saba-www    295 Jan 11 14:10 functions.php
-rw-r--r-- 1 sd123456 saba-www 363833 Jan 11 13:00 screenshot.png
-rw-r--r-- 1 sd123456 saba-www   1228 Jan 11 14:10 style.css
今後、テーマをカスタマイズしたい場合は、カスタマイズしたいファイルを「Twenty Seventeen」テーマのテーマフォルダーから子テーマのテーマフォルダにコピーし、そのファイルを編集します。
functions.phpファイルは親テーマと子テーマでマージされて使用されますが、それ以外のファイルは、子テーマフォルダーに存在するファイルが優先して使用されます(親テーマのファイルはマージされない)。
このように子テーマを作成することにより、カスタマイズしたファイルのみが、子テーマのテーマフォルダーに存在することになり、何をカスタマイズしたか容易に把握できます。
子テーマが完成したら、最後に有効化するのを忘れないでください。上記のテーマ一覧の中の作成した子テーマの有効化ボタンをクリックするのみです。
これで、子テーマの作成と有効化が完了です。
次回はサイトの多言語化です。
“WordPressでテーマの派生(子テーマ)を作成する” への1件の返信